“Custom Woocommerce
Measure Price Calculator ” Documentation by “Pixel
Power” v1.0
Created: 16/07/2014
By: PixelPower
Thank you for purchasing my plugin. If you have any questions that
are beyond the scope of this help file, please feel free to contact through
codecanyon.
Installation
1.
Download the extension
from your dashboard
2.
Go to Plugins
> Add New > Upload and select the ZIP file you just downloaded
3.
Click Install Now, and
then Activate
4.
Read the next sections
to learn how to setup and configure the plugin.
Calculator Basics
Default Units
The first step in
configuring the plugin is to select the default Dimension, Weight, Area, and/or
Volume units in which you’ll define your products’ area and volume. This is
done from WooCommerce > Settings >
Products > Product Data:

Configuring the
Calculator
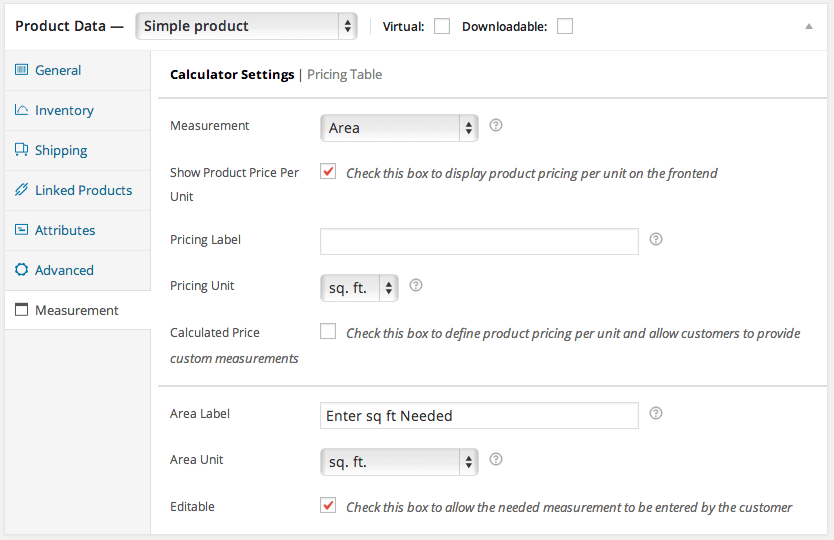
The plugin both modifies the “Shipping” tab and adds a new tab
named “Measurement” to the Product Data meta box in the product edit admin
page. In this tab, you select:
·
The Measurement to
calculate, for instance “Area”
·
Whether to display the
product price per unit on the frontend for easy comparisons (ie $1.68 sq. ft.) or simply the product price (ie $27.48). Enabling the checkbox will calculate a price
per unit based on the product price and configured measurement (under Shipping)
for the quantity.
·
Pricing label to
display next to the product price per unit (defaults to the “pricing unit” if
blank)
·
Pricing unit to
display with price
·
The label to display
next to the input field(s) (ie “Enter Sq Ft Needed”)
·
The input field’s unit
to display on the frontend
·
For the Dimensions,
Area, Volume, and Weight calculators you can choose whether a desired amount
can be entered by the user, which will automatically update the selected
quantity and price, or whether the value will be an informational display-only
value that is dynamically updated as the product quantity is changed
Available Units
The following units
are available natively with the plugin:
Weight
·
t (tonne/metric
ton)
·
kg
·
g
·
tn (short ton)
·
lbs
·
oz
Length
·
km
·
m
·
cm
·
mm
·
in
·
ft
·
yd
·
mi (mile)
Area
·
ha (hectare)
·
sq km
·
sq m
·
sq cm
·
sq mm
·
acs (acre)
·
sq. mi.
·
sq. yd.
·
sq. ft.
·
sq. in.
Volume
·
cu m
·
L
·
mL
·
gal
·
qt
·
pt
·
cup
·
fl. oz.
·
cu. yd.
·
cu. ft.
·
cu. in.
Notes:
·
SI (metric) and
English units can be mixed, though a small loss of precision may be experienced.
Use a consistent unit system for all measurements and for defining prices for a
given product for optimal results.
Creating Measurement
Products
Measurement Types
After you’ve set the default
store units, you can start setting up products. The first setup option you’ll
need to determine for any product is the Measurement type. You
can choose any of the following measurement types:
·
Dimensions: product
length, width, or height
·
Area: simple area, or
length x width
·
Perimeter: based on (2
x Length) + (2 x Width)
·
Volume: simple volume,
area x height, or length x width x height
·
Weight: the product
weight
·
Room Walls: an
area-type calculator intended for selling wallpaper

Note, for example,
the two versions of “area” (simple and L x W). This affects
the user input — do you want the customer to enter the square footage (or other
area unit)? Use simple area. Want customers to enter the length and width and
calculate area for them? Then you’d use the L x W version. This is true for
volume as well.
For each measurement
type, you can calculate price based on quantity-based mode (for
example, measured objects that come in defined packages, such as flooring), or
you can allow the user to enter the measurements, called user-defined
mode, for which price is calculated (for example, purchasing a number of
hours of tutoring).
Calculator Modes
You can switch
between calculator modes once you’ve determined measurement
type for your product. Determine whether customers should be able to set price
based on custom measurements (user-defined mode) or to only allow defined
quantities (quantity-based mode). For quantity-based mode, keep the “Calculated
Price” box unchecked; for user-defined mode, you must check the
“Calculated Price” box:
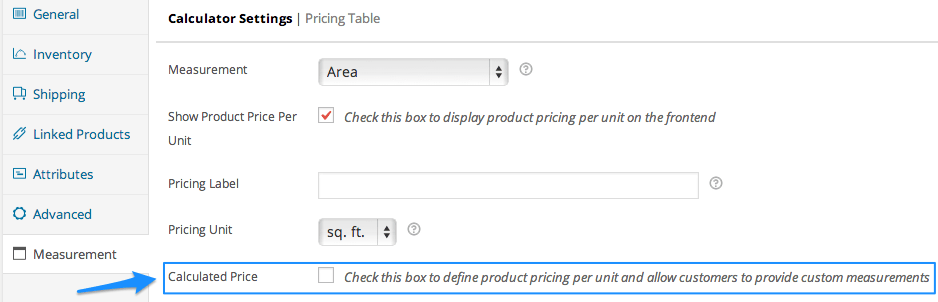
Select mode by enabling or disabling
calculated price
Quantity Mode
Configuration
The Quantity-based
Mode (disable “Calculated Price”) is used to assist customers with
determining the minimum quantity of product required to meet some measurement.
For instance, the number of boxes of tiles needed to cover a given square
footage would use an area calculator in quantity mode since the final price
will be based on a quantity of boxes.
Product Properties
After you’ve selected
“Measurement” type, you can set the regular price for the product. For a
quantity-based mode calculation, this should be the price of a quantity of
“one” — using the tile example, this will be the price of a whole box.
The price per square foot can be calculated from that if desired:

If you’re happy
displaying the price per box/quantity, you can leave the price as is. If you
want to display price per square foot (or per unit), you’ll
need to take one more step. To enable calculation of price per unit, go to the
“Measurement” tab under Product Data and enable the “Show Product Price per
Unit” box:

This will display the
price per unit (for easier comparison) instead of the price per quantity in the
product catalog.
Next, you’ll need to
define the product properties (Weight, Dimensions, Area, or
Volume) in the “Shipping” tab of the Product Data meta
box for your quantity. For my tile example, I need to set the area that
represents a quantity of “1 box”. Since 1 box will hold 12 sq
ft of tile, I enter 12 for my area value. This sets
the quantity values so that no matter what length x width (or area) the
customer enters, the calculator will include the correct number of boxes to
cover at least the area needed. (For convenience with the area/volume
measurements, you can set an exact value, ie 4 sq.
ft. or 1.7 cu m, or you can set a length and a width, ie
2 ft x 2 ft to derive the
area.)

After saving the
product, the product page will include the quantity-based calculator (this
example uses simple area and price per unit display):
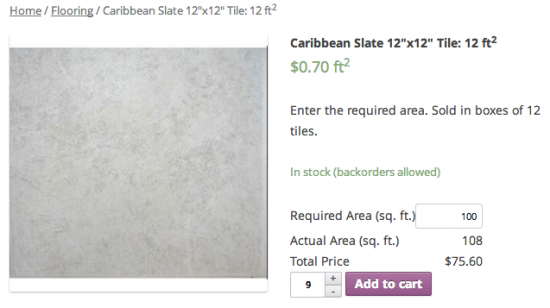
Product Using Quantity Mode
Here the customer supplies the area of the floor they need to
cover and the calculator determines the minimum quantity of product (boxes of
tile) required to meet or exceed the area.
User-Defined Mode
Configuration
Use the User-defined
Mode (enable “Calculated Price”) to sell customizable products which
are priced per measurement (i.e., fabric sold at $1.50 per yard). The pricing
calculator is configured very similarly to the quantity-based calculator above,
with a few exceptions. Firstly, dimensions are not required to
be configured for a product (under “Shipping”) since there’s no quantity, and
hence no defined properties. This calculator is intended for products with
user-supplied measurements, such as a tarp with a custom length/width, or mulch
sold by the cubic yard.
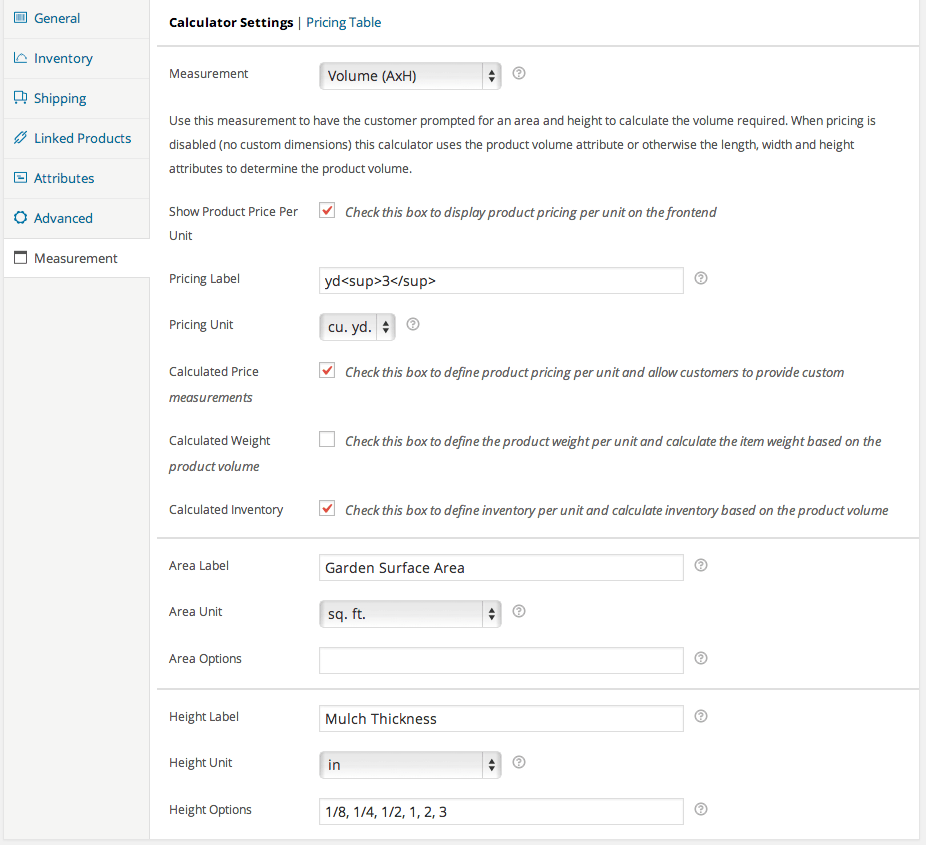
After selecting a
calculator measurement type (dimensions, area, volume, or weight), you enable
the “Show Product Price Per Unit” option, and then the
“Calculated Price” option which reveals a few new fields: Calculated Weight,
Calculated Inventory, and Area Options for the product measurements. The
Pricing Label will be shown next to the product price, and the Pricing Unit is
the unit the price is defined in.

Making these changes
also allows you to configure an optional minimum product price (useful for
products that have low costs so that some price is charged), as well as a price
“per unit” in the “General” tab, which is reflected in the Catalog and Product
pages:

Pricing Per Unit in Catalog
As shown in the
configuration image above, custom field labels can be configured (i.e., “Garden
Size” and “Thickness” for the product area and height inputs). Notice that
pricing mode also creates Measurement Options. Options can be
restricted to certain values by entering them, separated by commas, in the
“options” field, as in the above configuration image (here “Area Options” and
“Height Options”). Leaving the “Options” field empty will create a free-form
input box that the customer can enter any value into. Setting “Options” to a
single value creates a static measurement field on the frontend which can’t be
changed. Configuring a comma-separated list of values will create a dropdown on
the frontend for the customer to choose between; note that fractional values
are supported:

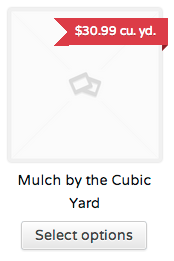
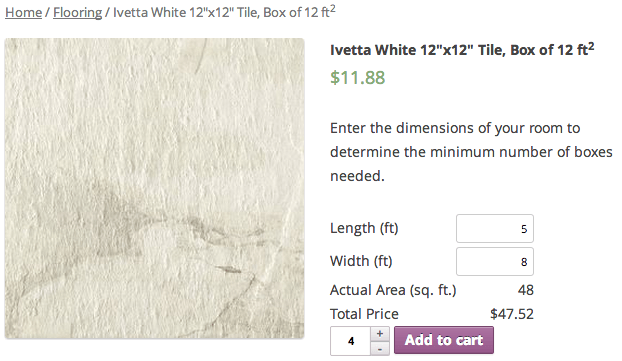
Product with Pricing Calculator
With this calculator configured
the customer enters the area in square feet they wish to cover with mulch, the
depth, and the calculator determines the total cubic yardage and thus price.
The product dimensions are shown in the cart:

Pricing Calculator Product in Cart
Remember, any of the
calculator measurements (dimensions, area, volume, or weight) can be used with
any combination of units and custom labels.
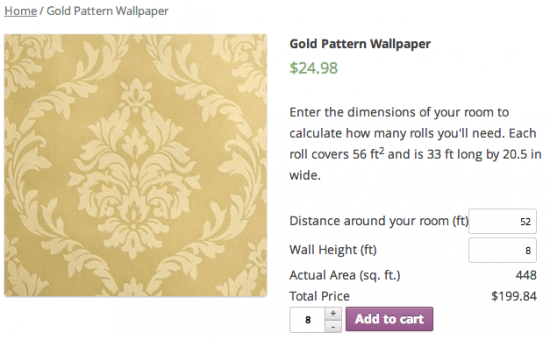
Room Walls Calculator
The Room Walls
calculator is simply an Area (length x width) calculator that is tailored for
wallpaper sales with length/width labels pre-defined for you. The wallpaper
product must have an area (either length x width, or simple area) defined so
that the number of rolls required can be calculated. The calculator prompts the
customer for the distance around the room and the height of the walls, those values
are used to determine the total wall area of the room regardless of shape, and
thus the quantity of wallpaper rolls required:
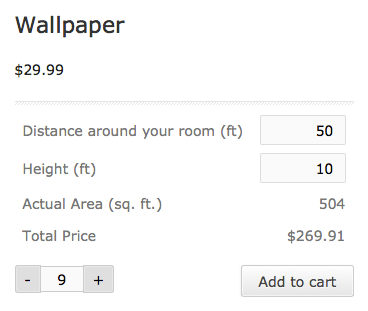
Product with Wallpaper Quantity Calculator
Features Supported
Inventory Support
Product inventory can
be managed “per unit” by enabling the “Calculated Inventory” option if you’re
using the user-defined mode. Doing so adds the configured pricing units to the
Product Data > Inventory – Stock Qty input,
meaning that if you sell for instance fabric by the foot, you can configure the
number of feet currently in stock:
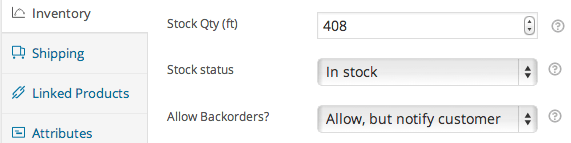
Inventory by the Foot
If the customer orders
2 x 10 foot products a total of 20 feet will be deducted from your available
inventory.
Dynamic Weight
Product weight can be configured
“per unit” by enabling the “Calculated Weight” option in user-defined mode.
Doing this adds the configured pricing units to the Product Data > Shipping
– Weight field, allowing you to set the weight “per unit”, (ie
lbs / sq ft) for your customizable product:
![]()
Example: Shipping based on Pounds per Square
Foot
Thus when your
customer orders 2 square feet of a product weighing 5 lbs
per sq ft, the product
weight will be set to 10 lbs and accurate shipping
prices can be calculated.
Pricing Table
The Pricing Table
feature allows you to create product prices that vary based on the product
measurement: dimension, area, volume, or weight, depending on the measurement
calculator in user-defined mode. Pricing table rules can be configured by
clicking the “Pricing Table” link found next to the “Calculator Settings”
heading on the Product Data > Measurement tab:
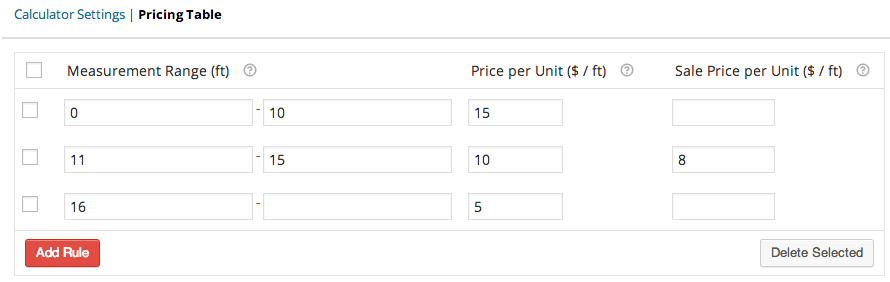
Easily configure product prices that vary
based on size
Defining a pricing
rule is easy with the following fields:
·
Measurement
Range – you need at
least a starting value (which can be 0). Configure an ending value to create a closed
range, or leave the end value empty for the last rule to create an “open” rule
that will match all measurements greater than or equal to the starting value.
The start/end range is inclusive, so 0-10 will match from 0 up to and including
10.
·
Price
per Unit – a pricing rule
must have a price per unit
·
Sale
Price per Unit – set a sale
price for this range
These pricing rules
will be automatically applied on the frontend as the customer configures their
product.
Note: Everyone’s pricing breaks will be different,
so this plugin respects pricing you set. Depending on your pricing breaks,
higher quantities of product may result in cheaper pricing. For example, lets assume that you have a
product that is sold by the foot:
0-10 ft: price $1/ft ⇨ if 10ft ordered, price = $10
11-20 ft: price $0.75/ft ⇨ if 11ft ordered, price = $8.25
You can easily list
the full set of prices with the shortcode
[wc_measurement_price_calculator_pricing_table]. When used on a product page, this will
display the pricing rules for that product. The shortcode
can be used anywhere on the site by simply providing either a product_id or product_sku:[wc_measurement_price_calculator_pricing_table product_sku="ABC123"]. The pricing rules will be displayed in a
table which can be styled to match your site:
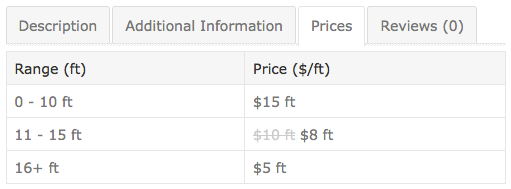
Prices are always up to date on the frontend
thanks to a simple yet powerful shortcode
This can be really
helpful for displaying product information within a blog post or on landing
pages. We recommend using the WooCommerce Tab Manager to create a custom
product tab to display this information.
Window Blinds Sellers: A note for window blinds sellers: this
feature will probably not allow a window blinds pricing table to be configured as
they generally require a price based on the width and height of a window. The
pricing table works only with the product total measurement, for instance the
total Area rather than the width/height.
Variable Products: Although the pricing table can be used
with product variations, these rules can currently only be
defined at the parent product level, meaning that all product variations will
share the same set of rules.
Boxes of Tile
(Quantity-Based Mode Product)
1.
Set the price per
box/quantity under “Regular Price”.
2.
Go to the “Shipping”
tab. Enter the size of your quantity. For example, if this is tile, you’ll want
to enter the total area the box will cover. If this is a dimension, volume, or weight
product, then you’ll want to enter the quantity for the corresponding
measurement that represents “one” of whatever you’re selling.
3.
Go to the
“Measurement” tab. Select the measurement type you need; for types such as
“area” that have multiple possibilities, choose the type that represents what
you’ll want customers to enter. Also select whether you want to display pricing
per quantity (regular price) or pricing per unit (calculated unit price).

Setting up a quantity product based on area
4.
Leave “Calculated
Price” disabled and change the measurement labels if desired. Save the product,
and it will look something like this on the frontend:
Quantity product using area
Fabric by the Yard
(User-defined Mode Product)
1.
Go to the
“Measurement” tab under Product Data. Select the Measurement type for your product.
Since we’re using fabric here, we’ll need a “Dimension” type (length). You’ll
need to enable pricing per unit since customers will be
entering the total number of units.
2.
Once “Show Product Price
per Unit” is enabled, you must also enable “Calculated Price” so that customers
can determine price based on measurement.
3.
Adjust any measurement
labels or options if needed.
4.
Go to the “General”
tab and enter the price per unit, as well as any sale or minimum pricing if
needed.

Price Mode using dimension product
5.
Save the product, and
customers will be able to enter the needed measurement on the frontend. The
quantity for the product will remain at 1, so customers can add quantity if
they need multiple cuts of fabric at the same length:

Mulch by the Cubic
Yard (User-defined Mode Product)
1.
Go to the “Measurement”
tab and choose the measurement type; I’ll use Volume (AxH)
in this example. Enable “Show Pricing per Unit” and “Calculate Price”.
2.
Enter your units and
change measurement labels if needed. Note that in this example I’m setting
fixed options for the mulch height/thickness. This will create a dropdown menu
for customers on the frontend:
3.
Go to the “General”
tab and enter pricing information. In this example, I’m going to set the
minimum price at $11.00, which will be equivalent to 0.50 cu. yds.
4.
Save the product
information. Notice that in the first image, the customer hasn’t entered enough
mulch to meet the minimum price, so $11 is listed. Once the customer has
exceeded the minimum price, as in the second image, the accurate price is
displayed:


Wallpaper for a Room
(Quantity-based Mode)
1.
Go to the “General” tab
and set the regular price as the price per roll of wallpaper.
2.
Go to the “Shipping”
tab. Enter either the area per roll, or the length and width of the roll in
your default unit to set the size of the quantity (area of one roll).
3.
Go to the
“Measurement” tab and select the “Room Walls” product type. Determine whether
or not you’d like to display the price per roll or price per unit (enable “Show
Price per Unit” if so), and adjust labels / units if needed.
4.
Finish product setup
and save. The product page will look something like this: